什么是多路复用

操作系统在处理 I/O 的时候,分为两个阶段:

  1. 等待数据到达内核空间。
  2. 等待数据从内核空间拷贝到用户空间。

在 Linux 操作系统中,多路复用的方式有三种。分别是 select,poll,和 epoll。I/O 多路复用为,只通过一种机制,可以监视多个描述符,一旦某个描述符就绪(读就绪/写就绪),能够通知程序进行相应的读写操作。

但 select,poll,epoll 本质上都是同步 I/O,因为他们都需要在读写事件就绪后自己负责进行读写,也就是说这个读写过程是阻塞的,而异步 I/O 则无需自己负责进行读写,异步 I/O 的实现会负责把数据从内核拷贝到用户空间。

select

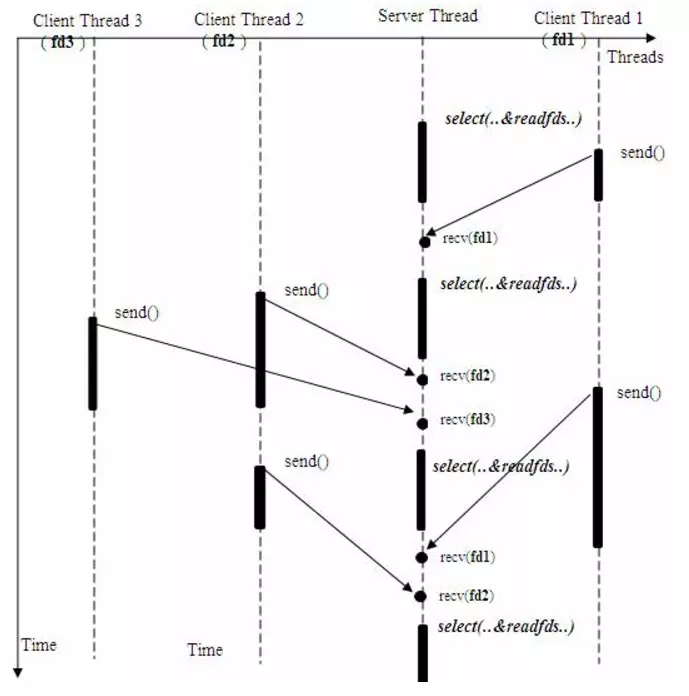
单个进程就可以同时处理多个网络连接的 I/O 请求(同时阻塞多个 I/O 操作)。

基本原理就是:

  1. 程序调用 select,然后整个程序就阻塞状态。
  2. 这时候,内核就会轮询检查所有 select 负责的文件描述符集合 fd_set(一般上限为 1024 个),当找到其中那个的数据准备好了的文件描述符返回给 select。
  3. select 进行系统调用,将数据从内核复制到进程缓冲区(用户空间)。

1

select的缺点:

  1. 每次调用 select,都需要把 fd_set 从用户态拷贝到内核态,这个开销在 fd 很多时会很大。
  2. 同时每次调用 select 都需要在内核遍历传递进来的所有 fd,这个开销在 fd 很多时也很大
  3. select 支持的文件描述符数量太小了,默认是 1024

poll

poll的原理与select非常相似,差别如下:

  1. 描述fd集合的方式不同,poll 使用 pollfd 结构而不是 fd_set 结构,是链式的,所以没有最大连接数的限制。
  2. poll 有一个特点是水平触发,也就是通知程序 fd 就绪后,这次没有被处理,那么下次 poll 的时候会再次通知同样的 fd 已经就绪。

poll 解决了 fd_set 有上限的情况,并且每次读就绪描述符集合时不用保存之前的状态。

epoll

epoll 提供了三个函数:

1
2
3
4
5
6
7
8
int epoll_create(int size);
// 建立一個 epoll 对象,并传回它的id

int epoll_ctl(int epfd, int op, int fd, struct epoll_event *event);
// 事件注册函数,将需要监听的事件和需要监听的fd交给epoll对象

int epoll_wait(int epfd, struct epoll_event *events, int maxevents, int timeout);
// 等待注册的事件被触发或者timeout发生

epoll解决的问题:

  1. epoll没有fd数量限制

epoll没有这个限制,我们知道每个 epoll 监听一个 fd,所以最大数量与能打开的 fd 数量有关,一个 G 的内存的机器上,能打开10万个左右

  1. epoll 不需要每次都从用户空间将 fd_set 复制到内核

epoll 在用 epoll_ctl 函数进行事件注册的时候,已经将 fd 复制到内核中,所以不需要每次都重新复制一次

  1. select 和 poll 都是主动轮询机制,需要遍历每一个人 fd;而 epoll 是被动触发方式。

epoll_ctl 给 fd 注册了相应事件的时候,我们为每一个 fd 指定了一个回调函数,当数据准备好之后,就会把就绪的 fd 加入一个就绪的队列中,epoll_wait 的工作方式实际上就是在这个就绪队列中查看有没有就绪的 fd,如果有,就唤醒就绪队列上的等待者,然后调用回调函数。

虽然 epoll, poll, select 都需要查看是否有 fd 就绪,但是 epoll 之所以是被动触发,就在于它只要去查找就绪队列中有没有 fd,就绪的 fd 是主动加到队列中,epoll 不需要一个个轮询确认。

换一句话讲,就是 select 和 poll 只能通知有 fd 已经就绪了,但不能知道究竟是哪个 fd 就绪,所以 select 和 poll 就要去主动轮询一遍所有监听的 fd 才能找到就绪的 fd。而 epoll 则是不但可以知道有 fd 可以就绪,而且还具体可以知道就绪 fd 的编号,所以直接找到就可以,不用轮询。

注意,epoll 只有 Linux 上面有。

callgrind

callgrind 是 valgrind 套件中的一个工具,使用方式为

1
valgrind --tool=callgrind ./your_program your_program_args1 your_program_args2

运行之后,可以生成一份 callgrind.out.pid 的文件,在当前目录下。这份文件记录了运行时的一些数据,以及函数调用关系。

kcachegrind

kcachegrind 可以分析上述产生的 callgrind.out.pid 的文件,并且点击下方 call graph 可以看到调用关系图,帮助我们分析代码结构。

点击下载windows版kcachegrind

示例

代码:

1
2
3
4
5
6
7
8
9
10
11
12
13
14
15
16
17
18
19
20
21
22
23
#include <iostream>
using namespace std;

int accumulate(int begin, int end) {
int result = 0;
for (int i = begin; i < end; i++) {
result += i;
}
}

int accumulate0_100000() {
return accumulate(0, 100000);
}

int accumulate0_200000() {
return accumulate(0, 200000);
}

int main() {
accumulate0_100000();
accumulate0_200000();
return 0;
}
1
valgrind --tool=callgrind --dump-instr=yes --trace-jump=yes ./a.out

kcachegrind分析

生成文件后,使用 kcachegrind 工具打开这个分析文件。

1

可以从图中看到函数执行时间,百分比等功能。

gprof2dot分析

使用 gprof2dot 工具,需要安装 python 和 graphviz。

1
2
yum install graphviz
pip3 install gprof2dot

之后使用上述工具对其进行分析,生成调用图。

1
2
gprof2dot -f callgrind -n0 -e0 ./callgrind.out.2328 > callgrind.2328.dot
dot callgrind.2328.dot -Tsvg -o callgrind.2328.dot.svg

其中 -f 指定输出格式为 callgrin d格式,-nX 指定生成的文件忽略小于 X 个 node 的函数,例如 -n10,代表函数节点小于 10 个的,在最终文件中不生成其相关信息,-eX 代表边缘阈值,与 -n 类似。

四种转换介绍

C风格转换:转换的含义是通过改变一个变量的类型为别的类型从而改变该变量的表示方式。为了类型转换一个简单对象为另一个对象,会使用传统的类型转换操作符。比如,为了转换一个类型为 double 的浮点数的指针到整型:

1
2
3
4
int i;
double d;
i = (int)d;
i = int(d);

对于具有标准定义转换的简单类型而言很好。但是这样的转换符不能随意用于类(class)和类的指针。标准定义了四个新的转换符:reinterpret_cast, static_cast, dynamic_cast 和 const_cast,目的在于控制类之间的类型转换。

reinterpret_cast

reinterpret_cast 转换一个指针为其它类型的指针。它也允许从一个指针转换为整数类型。反之亦然。这个操作符能够在非相关的类型之间转换。操作结果只是简单的从一个指针到别的指针的值的二进制拷贝。在类型之间指向的内容不做任何类型的检查和转换。

代码:

1
2
3
4
class A {};
class B {};
A *a = new A;
B *b = reinterpret_cast<B *>(a);

reinterpret_cast 就像传统的类型转换一样对待所有指针的类型转换。

static_cast

static_cast 允许执行任意的隐式转换和相反转换动作。(相关类之间转换)

应用到类的指针上,意思是说它允许子类类型的指针转换为父类类型的指针(这是一个有效的隐式转换),同时,也能够执行相反动作:转换父类为它的子类。

在这最后例子里,被转换的父类没有被检查是否与目的类型相一致。

代码:

1
2
3
4
class Base {};
class Derived : public Base {};
Base *a = new Base;
Derived *b = static_cast<Derived *>(a);

static_cast 除了操作类型指针,也能用于执行类型定义的显式的转换,以及基础类型之间的标准转换:

1
2
double d = 3.14159265;
int i = static_cast<int>(d);

如果转换的类型之间没有关系的话,会报编译错误:

1
2
3
4
5
@└────> # g++ test.cc 
test.cc: In function ‘int main()’:
test.cc:12:41: error: invalid static_cast from type ‘Base*’ to type ‘Derived*’
Derived *b = static_cast<Derived *>(a);
^

如果子类中有基类没有的对象,那么转换后使用则不安全。

dynamic_cast

dynamic_cast 只用于对象的指针和引用。当用于多态类型时,它允许任意的隐式类型转换以及相反过程。不过,与 static_cast 不同,在自上而下的转换过程中, dynamic_cast 会检查操作是否有效。也就是说,它会检查转换是否会返回一个被请求的有效的完整对象。
检测在运行时进行。如果被转换的指针不是一个被请求的有效完整的对象指针,返回值为NULL.
代码:

1
2
3
4
5
6
7
8
class Base { virtual dummy() {} };
class Derived : public Base {};

Base* b1 = new Derived;
Base* b2 = new Base;

Derived* d1 = dynamic_cast<Derived *>(b1); // 成功
Derived* d2 = dynamic_cast<Derived *>(b2); // 失败,返回NULL

用于安全向下转型,成本非常高昂。

const_cast

这个转换类型操纵传递对象的 const 属性,或者是设置或者是移除
代码:

1
2
3
class C {};
const C *a = new C;
C *b = const_cast<C *>(a);

其它三种操作符是不能修改一个对象的常量性的。
const_cast 在调用第三方函数中的使用:
在使用第三方库或API时,它们只提供了非 const 类型的参数的函数,但我们只有 const 类型的对象。

1
2
3
4
5
6
7
8
9
10
11
12
13
14
#include <iostream>
using namespace std;
int third_lib_fun(int *ptr) {
*ptr = *ptr + 10;
return (*ptr);
}
int main(void) {
int val = 10;
const int *ptr = &val;
int *ptr1 = const_cast<int *>(ptr);
third_lib_fun(ptr1);
cout << val;
return 0;
}

输出结果:

1
20

我们在使用第三方库和 API 的时候,我们只能调用,看不到其具体的实现,为了能够调用成功,需要使用 const_cast 来去除 *ptr 的 const 属性。

锁是用来防止不同线程访问同一个共享资源时发生数据竞争风险,保证访问的先后顺序而达到数据的一致性访问。本文介绍的 lock_guard 和 unique_lock,都是对 std::mutex 进行封装,实现 RAII 的效果。这两种锁本质差不多,而 unique_lock 的功能比 lock_guard 多一些。

lock_guard

lock_guard 用来管理一个 std::mutext 类型的对象,定义一个 lock_guard 对象同时调用构造函数,对 std::mutex 进行上锁,退出作用域时析构,从而进行解锁。

1
std::lock_guard<std::mutex> lock(mutex_name);

特点如下:

  1. 创建即加锁,退出作用域自动解锁,避免忘记解锁。
  2. 无需手工解锁。不能中途解锁。
  3. 无法复制。
  4. 并不管理 std::mutex 的生命周期,如果在作用域内的时候 std::mutex 被释放了,那就会出现空指针错误。

使用示例:

1
2
3
4
5
6
7
8
9
10
11
12
13
14
15
16
17
18
19
20
21
#include <thread>
#include <mutex>
#include <iostream>

int g_i = 0;
std::mutex g_i_mutex;

void safe_increment() {
const std::lock_guard<std::mutex> lock(g_i_mutex);
++g_i;
std::cout << std::this_thread::get_id() << ": " << g_i << std::endl;
}

int main() {
std::cout << "start: " << g_i << '\n';
std::thread t1(safe_increment);
std::thread t2(safe_increment);
t1.join();
t2.join();
std::cout << "end: " << g_i << '\n';
}

输出:

1
2
3
4
5
@└────> # ./a.out 
start: 0
140365627524864: 1
140365619132160: 2
end: 2

unique_lock

虽然 lock_guard 挺好用的,但是有个很大的缺陷,在定义 lock_guard 的地方会调用构造函数加锁,在离开定义域的话 lock_guard 就会被销毁,调用析构函数解锁。这就产生了一个问题,如果这个定义域范围很大的话,那么锁的粒度就很大,很大程序上会影响效率。
所以为了解决 lock_guard 锁的粒度过大的问题,unique_lock 就出现了。

方法 说明 详细说明
explicit unique_lock(mutex_type& m); 加锁 新创建的 unique_lock 对象,管理 Mutex 对象 m,并尝试调用 m.lock() 对 Mutex 对象进行上锁,如果此时另外某个 unique_lock 对象已经管理了该 Mutex 对象 m,则当前线程将会被阻塞
unique_lock(mutex_type& m, try_to_lock_t tag); 尝试加锁 try-locking 初始化新创建的 unique_lock 对象,管理 Mutex 对象 m,并尝试调用 m.try_lock() 对 Mutex 对象进行上锁,但如果上锁不成功,并不会阻塞当前线程。
unique_lock(mutex_type& m, defer_lock_t tag) noexcept; 延迟加锁 初始化新创建的 unique_lock 对象,管理 Mutex 对象 m,但是在初始化的时候并不锁住 Mutex 对象。 m 应该是一个没有当前线程锁住的 Mutex 对象。
unique_lock(mutex_type& m, adopt_lock_t tag); 递归加锁 初始化新创建的 unique_lock 对象管理 Mutex 对象 m, m 应该是一个已经被当前线程锁住的 Mutex 对象。(并且当前新创建的 unique_lock 对象拥有对锁(Lock)的所有权)。

特点如下:

  1. 创建时可以不锁定(通过指定第二个参数为 std::defer_lock),而在需要时再锁定。
  2. 可以随时加锁解锁(调用 lock 或者 unlock 成员函数)。
  3. 作用域规则同 lock_grard,析构的时候会判断当前锁的状态来决定是否解锁,如果当前状态已经是解锁状态了,那么就不会再次解锁,而如果当前状态是加锁状态,就会自动调用unique.unlock()来解锁。
  4. 不可复制,可移动
  5. 条件变量需要该类型的锁作为参数(此时必须使用 unique_lock)
1
2
condition_variable cv;
cv.wait(unique_lock); // 会做两件事1:使线程进入等待状态 2:unique_lock.unlock 把mtx给释放掉

unique_lock 示例:

1
2
3
4
5
6
7
8
9
10
11
12
13
14
15
16
17
18
19
20
21
22
23
24
25
26
27
28
29
#include <mutex>
#include <thread>
#include <chrono>
#include <iostream>

struct Box {
explicit Box(int num) : num_things{num} {}
int num_things;
std::mutex m;
};

void transfer(Box &from, Box &to, int num) {
std::unique_lock<std::mutex> lock1(from.m, std::defer_lock);
std::unique_lock<std::mutex> lock2(to.m, std::defer_lock);
std::lock(lock1, lock2);
from.num_things -= num;
to.num_things += num;
}

int main() {
Box box1(100);
Box box2(50);
std::thread t1(transfer, std::ref(box1), std::ref(box2), 10);
std::thread t2(transfer, std::ref(box2), std::ref(box1), 5);
t1.join();
t2.join();
std::cout << "box1:" << box1.num_things << std::endl;
std::cout << "box2:" << box2.num_things << std::endl;
}
1
2
3
@└────> # ./a.out 
box1:95
box2:55

总结

unique_lock 内部会维护一个锁的状态,所以在效率上肯定会比 lock_guard 慢。所以在能使用 lock_guard 的情况下尽量优先使用 lock_guard。

区别

先来看一段代码:

1
2
3
struct A;
std::shared_ptr<A> p1 = std::make_shared<A>();
std::shared_ptr<A> p2(new A);

他俩是有区别的,使用 make_shared 的方式只会申请一次内存,而使用 new 的方式要申请两次。
shared_ptr 内部有一个计数器,会维护指向当前对象的指针个数。

  1. 在使用 new 的方式申请的时候,先用 new 申请指向对象的内存,再申请 shared_ptr 中维护计数部分的内存,所以是两次申请。
  2. 用make_shared 的方式,是把指向对象部分和维护计数部分合在一起,一起申请,所以是一次申请。

那这两种有什么影响呢?

影响

1
2
3
4
void func(std::shared_ptr<Lhs> &lhs, std::shared_ptr<Rhs> &rhs) {
// do something
}
func(std::shared_ptr<Lhs>(new Lhs()), std::shared_ptr<Rhs>(new Rhs()));

C++ 允许在做参数运算的时候 打乱顺序,所以执行顺序可能为这样:

  1. new Lhs();
  2. new Rhs();
  3. shared_ptr 构造
  4. shared_ptr 构造

假设在步骤 2 中,因为内存不足抛出了异常。之后我们就丢失了 1 中申请的内存,因为 shared_ptr 还没有指向它,也就没有接受管理。有一种解决方案:

1
2
3
auto lhs = std::shared_ptr<Lhs>(new Lhs());
auto rhs = std::shared_ptr<Rhs>(new Rhs());
func(lhs, rhs);

这样不够优雅,所以诞生了 make_shared:

1
func(std::make_shared<Lhs>(), std::make_shared<Rhs>());

make_shared 的缺点

因为 make_shared 是申请(控制块 + 数据块)一整块内存,所以也是一起释放。weak_ptr 可以无限期地保持控制块的存活。
使用 new 申请的 shared_ptr 内存分布
使用 make_shared 申请的 shared_ptr 内存分布
为什么 weak_ptr 的实例会使控制块保持活动状态?
必须有一种方法让 weak_ptr 来确定托管对象是否仍然有效(例如for lock)。他们通过检查 shared_ptr 拥有托管对象的数量来实现这一点,该托管对象存储在控制块中。结果是控制块处于活动状态,直到 shared_ptr 计数和 weak_ptr 计数都达到 00,才会释放整个控制块和数据块。

什么是智能指针

智能指针是一个管理指针。用来存储指向动态分配对象(在堆区 new 出来的)的指针。在它的生命周期结束时,它可以负责自动释放动态分配的对象,调用析构函数,以达到防止堆内存泄露的目的。

智能指针发展史

  1. C++98 引入 auto_ptr (已废弃)
  2. C++11 引入 unique_ptr 和 shared_ptr

原理

RAII

RAII 代表 resource acquisition is initialization 的缩写,意为“资源获取即初始化”。它是 C++ 之父提出的设计理念,核心是把资源和对象的生命周期绑定,对象创建获取资源,销毁释放资源。这样做有两大好处:

  1. 不需要显式的释放资源。
  2. 对象所需资源在其生命周期始终保持有效。

实现一个简单的智能指针:

1
2
3
4
5
6
7
8
9
10
11
12
13
14
15
16
17
18
19
20
21
#include <iostream>
using namespace std;

template<class T>
class smartPtr {
public:
smartPtr(T* ptr = nullptr) : ptr_(ptr) {}
~smartPtr() {
if (ptr_) {
delete ptr_;
}
cout << "~smartPtr called!" << endl;
}
private:
T* ptr_;
};
int main() {
int* a = new int(1);
smartPtr<int> sp(a); //将a 指针委托给sp对象管理
smartPtr<int>sp2(new int(2)); //直接船舰匿名对象给sp2管理
}

上面的还不足以称为智能指针,因为

  1. 没有重载运算符 * 和 ->
  2. 如果使用了拷贝或者赋值操作,由于是浅拷贝,会有 double free 的错误。
1
2
3
4
5
int main() {
smartPtr<Date> sp(new Date);
smartPtr<Date> sp2(sp); // 发生浅拷贝,开辟的两个smartPtr对象指向同一个内存。
return 0; // 两个都调用析构,第二次析构出现问题。
}

auto_ptr

1
2
3
4
5
6
7
8
9
10
11
12
13
14
15
16
17
18
#include <iostream>
#include <memory> // 智能指针定义在此
using namespace std;
class Date {
public:
Date(): year_(0), month_(0), day_(0) {}
~Date(){}
int year_;
int month_;
int day_;
};

int main() {
auto_ptr<Date> ap(new Date);
//拷贝构造
auto_ptr<Date> copy(ap);
ap->year_ = 2022;
}

可以发现报错了。原因是对于 auto_ptr 来说,赋值后之前的指针就被置空了。在拷贝或者赋值的过程中,auto_ptr 会传递所有权,将资源全部从源指针转移给目标指针,源指针被置空。虽然这种方法确实解决了浅拷贝的问题,但是我们使用auto_ptr的时候要注意,不要对源指针进行访问或者操作。
auto_ptr 实现代码:

1
2
3
4
5
6
7
8
9
10
11
12
13
14
15
16
17
18
19
20
21
22
23
24
25
26
27
28
29
30
31
32
template<class T>
class auto_ptr {
public:
auto_ptr(T* ptr = nullptr) : ptr_(ptr) {}

auto_ptr(auto_ptr<T>& ap) : _ptr(ap.ptr_) { // 拷贝构造
ap.ptr_ = nullptr; // 源指针管理权转移
}

auto_ptr<T>& operator = (auto_ptr<T>& ap) { // 赋值构造
if (this != *ap) {
delete ptr_;
ptr_ = ap.ptr_;
ap.ptr_ = nullptr;
}
return *this;
}

~auto_ptr() {
if (ptr_) {
delete ptr_;
}
}
T& operator *() { // 重载 * 运算符
return *ptr_;
}
T* operator ->() { // 重载 -> 运算符
return ptr_;
}
private:
T* ptr_;
};

unique_ptr

相比 auto_ptr,unique_ptr 得不到就毁掉,不允许别人拿到。禁用拷贝和赋值构造函数。只能采用移动。

1
2
3
4
5
6
7
8
9
10
11
12
13
14
15
16
17
18
19
20
21
22
template<class T>
class unique_ptr {
public:
unique_ptr(T* ptr = nullptr) : ptr_(ptr) {}

unique_ptr(unique_ptr<T>& ap) = delete;
unique_ptr<T>& operator = (unique_ptr<T>& ap) = delete;

~unique_ptr() {
if (ptr_) {
delete ptr_;
}
}
T& operator *() { // 重载 * 运算符
return *ptr_;
}
T* operator ->() { // 重载 -> 运算符
return ptr_;
}
private:
T* ptr_;
};

shared_ptr

shared_ptr 使用最为广泛,可以提供安全的拷贝构造。

原理:

对一个资源加一个计数器,让所有管理资源的 shared_ptr 共用这个计数器。如果发生拷贝,计数器 +1+1。等于 00 的时候,就析构。
再具体一点:

  1. shared_ptr 在其内部,给每个资源都维护了着一份计数,用来记录该份资源被几个对象共享。
  2. 在对象析构函数调用时,对象的引用计数减一。
  3. 如果引用计数是 0,就说明自己是最后一个使用该资源的对象,必须释放该资源;
  4. 如果不是 0,就说明除了自己还有其他对象在使用该份资源,不能释放该资源,否则其他对象就成野指针了。

模拟实现代码:

1
2
3
4
5
6
7
8
9
10
11
12
13
14
15
16
17
18
19
20
21
22
23
24
25
26
27
28
29
30
31
32
33
34
35
36
37
38
39
40
41
42
43
44
45
template<class T>
class shared_ptr {
public:
shared_ptr(T* ptr =nullptr) : ptr_(ptr), pcount_(new int(1)) {}
//拷贝构造
shared_ptr(const T& sp) ptr_(sp.ptr_), pcount_(sp.pcount_) {
++(*pcount_);
}
// 赋值拷贝1
shared_ptr<T>& operator = (shared_ptr<T>& sp) {
if (ptr_ != sp.ptr_) { // 注意:如果对自己赋值可能会误析构资源。
if (--(*pcount_) == 0) { // 先析构自己,再赋值为别人的,以免内存泄漏
delete pcount_;
delete ptr_;
}
ptr_ = sp.ptr_;
pcount_ = sp.pcount_;
++(*pcount_);
}
return *this;
}
/** 赋值构造写法2
shared_ptr<T>& operator=(shared_ptr<T> sp) {
swap(_ptr, sp._ptr);
swap(_pcount, sp._pcount);
return *this;
}
**/
T& operator *() {
return *ptr_;
}
T* operator ->() {
return ptr_;
}

~shared_ptr() {
if (--(*pcount_) == 0 && ptr_) { // 只有引用计数为 0 才释放
delete pcount_;
delete ptr_;
}
}
private:
T* ptr_;
int* pcount_; // 所有指向同一块内存的share_ptr共享,所以申请在堆区
};

拷贝构造图解:

1

多线程版

上述代码没有考虑多线程,下面有个带锁版本,仅供参考:

1
2
3
4
5
6
7
8
9
10
11
12
13
14
15
16
17
18
19
20
21
22
23
24
25
26
27
28
29
30
31
32
33
34
35
36
37
38
39
40
41
42
43
44
45
46
47
48
49
50
51
52
53
54
55
56
57
58
59
60
61
62
63
64
65
66
template<class T>
class shared_ptr {
public:
shared_ptr(T* ptr = nullptr) : _ptr(ptr), _pcount(new int(1)),
_pmtx(new mutex) {}

void add_ref() {
_pmtx->lock();
++(*_pcount);
_pmtx->unlock();
}

void release_ref() {
bool flag = false; // 是否释放锁的内存
_pmtx->lock();
if (--(*_pcount) == 0 && _ptr) {
delete _pcount;
delete _ptr;
flag = true;
cout << "释放资源:" << _ptr << endl;
}
_pmtx->unlock();
if (flag) {
delete _pmtx;
}
}

shared_ptr(const shared_ptr<T>& sp) : _ptr(sp._ptr), _pcount(sp._pcount),
_pmtx(sp._pmtx) {
add_ref();
}
shared_ptr<T>& operator = (const shared_ptr<T>& sp) {
if (_ptr != sp._ptr) {
if (--(*_pcount) == 0){
delete _pcount;
delete _ptr;
}
_ptr = sp._ptr;
_pcount = sp._pcount;
add_ref();
}
return *this;
}
T& operator *() {
return *_ptr;
}

T* operator ->() {
return _ptr;
}

T* get() {
return _ptr;
}
int use_count() {
return *_pcount;
}

~shared_ptr() {
release_ref();
}
private:
T* _ptr;
int* _pcount;
mutex* _pmtx; // 此锁用于访问 _pcount时同步用
};

删除器

库中的shared_ptr,我们在析构的时候默认都是 delete _ptr,如果我们托管的类型是 new T[] ,或者 malloc 出来的话,就导致类型不是匹配的,无法析构。这个时候我们要自定义删除器,如下:

1
2
3
4
5
6
7
8
9
10
11
12
13
14
15
16
17
18
19
20
#include <iostream>
#include <memory>
using namespace std;
template<class T>
struct DeleteArray {
void operator()(T* ptr) { // 仿函数
cout << "delete functor called!" << endl;
delete[] ptr;
}
};

int main() {
DeleteArray<string> delfunctor; //使用仿函数定制
std::shared_ptr<string>s2(new string[10], delfunctor);
std::shared_ptr<string>s3((string*)malloc(sizeof(100)), [](string* ptr) {
cout << "call free!" << endl;
free(ptr);
}); //使用lamdba 定制
return 0;
}
1
2
3
@└────> # ./a.out 
call free!
delete functor called!

weak_ptr

有以下情形:

1
2
3
4
5
6
7
8
9
10
11
12
13
14
15
16
17
18
#include <iostream>
#include <memory>
using namespace std;
struct ListNode {
shared_ptr<ListNode> prev_;
shared_ptr<ListNode> next_;
int val_;
~ListNode() {
cout << "~ListNode called!" << endl;
}
};

int main() {
shared_ptr<ListNode> n1(new ListNode);
shared_ptr<ListNode> n2(new ListNode);
n1->next_ = n2;
n2->prev_ = n1;
}

运行发现,析构函数没有被调用。
2
两边引用计数都是2,像是死锁一样,都不会析构。这时候就要用到 weak_ptr了。weak_ptr 是一个弱引用,它是为了配合shared_ptr而引入的一种智能指针,是为了解决循环引用而生的。我们只能使用 weak_ptr 或者 shared_ptr 去初始化它。
我们在会产生循环引用的位置,把shared_ptr 换成 weak_ptr。 weak_ptr 不是一个 RAII 智能指针,它不参与资源的管理,他是专门用来解决引用计数的,我们可以使用一个shared_ptr 来初始化一个 weak_ptr,但是 weak_ptr 不增加引用计数,不参与管理,但是也像指针一样访问修改资源。
上面代码修改为:

1
2
3
4
5
6
7
8
9
10
11
12
13
14
15
16
17
18
#include <iostream>
#include <memory>
using namespace std;
struct ListNode {
weak_ptr<ListNode> prev_;
weak_ptr<ListNode> next_;
int val_;
~ListNode() {
cout << "~ListNode called!" << endl;
}
};

int main() {
shared_ptr<ListNode> n1(new ListNode);
shared_ptr<ListNode> n2(new ListNode);
n1->next_ = n2;
n2->prev_ = n1;
}

实现代码参考:

1
2
3
4
5
6
7
8
9
10
11
12
13
14
15
16
17
18
19
20
21
22
23
24
25
26
27
28
29
30
template<class T>
class weak_ptr {
public:
weak_ptr() : _ptr(nullptr) {}
// 用 shared_ptr 初始化
weak_ptr(shared_ptr<T>& sp) :_ptr(sp.get()), _pcount(sp.use_count()) {}
weak_ptr(weak_ptr<T>& sp) : _ptr(sp._ptr), _pcount(sp._pcount) {}
weak_ptr& operator = (shared_ptr<T>& sp) {
_ptr = sp.get();
_pcount = sp.use_count();
return *this;
}
weak_ptr& operator = (weak_ptr<T>& sp) {
_ptr = sp._ptr;
_pcount = sp._pcount;
return *this;
}
T& operator*() {
return *_ptr;
}
T* operator->() {
return _ptr;
}
int use_count() {
return *_pcount;
}
private:
T* _ptr;
int* _pcount; // 只记录 share_ptr 引用个数,weak_ptr的观测不会增加它
};

Cpp的三大特性:封装,继承,多态

封装

  • 类是数据封装的工具,对象是数据封装的实现。在封装中,还提供了一种对数据访问的控制机制,使得一些数据被隐藏在封装体内。封装体与外界进行信息交换是通过操作接口进行的。
  • 封装性实际上是由编译器去识别 public,private,protected 来实现的。只有类体内的成员函数才能访问私有成员,在类体外的函数不能访问。公有成员是封装体与外界的一个接口,类体外的函数可以访问公有成员,保护成员只有该类的派生类可以访问。
  • 类是一种复杂的数据类型,他将不同类型的数据和相关操作封在一起的集合体。因此类具有对数据的抽象性,隐蔽性和封装性。
  • 封装目的是为了增加代码的健壮性,减少写代码时出错的概率。只要编译可以通过,在 C++ 中无论是 public,private,protect,生成的汇编代码都是一样的。

继承

  • C++ 允许单继承和多继承。
  • 继承机制的目的时为了可以重复使用程序资源。
  • 继承有两个方面,一是可以拥有父类的所有成员变量,第二子类也拥有父类的所有成员函数

多态

  • 多态是指,对不同类对象发出相同消息,会有不同的实现。多态是指发出同样的消息被不同的数据类型的对象接受后导致不同的行为。
  • C++ 多态表现为:
  1. 允许函数重载和运算符重载。
  2. 通过定义虚函数来支持动态联编。
  • 多态特性增加了一些数据存储和执行指令开销,能不用就不用。

C代码实现

定义函数指针

1
2
3
4
5
6
7
8
9
10
11
12
int add(int a, int b) {
return a + b;
}

// 定义函数指针
int (*padd)(int, int);
padd = add;

// 用typedef重命名
typedef int (*PADD)(int, int);
PADD padd;
padd = add;

继承和多态代码

简单实现:

1
2
3
4
5
6
7
8
9
10
11
12
13
14
15
16
17
18
19
20
21
22
23
24
25
26
27
28
29
30
31
32
#include <stdio.h>
//C语言模拟C++的继承与多态
typedef void (*FUN)(); //定义一个函数指针来实现对成员函数的继承
typedef struct _A { //父类
FUN _fun; //由于C语言中结构体不能包含函数,故只能用函数指针在外面实现
int _a;
} _A;

typedef struct _B { //子类
_A _a_; //在子类中定义一个基类的对象即可实现对父类的继承
int _b;
} _B;

void _fA() { //父类的同名函数
printf("_A:_fun()\n");
}
void _fB() { //子类的同名函数
printf("_B:_fun()\n");
}

int main() {
//C语言模拟继承与多态的测试
_A _a; //定义一个父类对象_a
_B _b; //定义一个子类对象_b
_a._fun = _fA; //父类的对象调用父类的同名函数
_b._a_._fun = _fB; //子类的对象调用子类的同名函数

_A* p2 = &_a; //定义一个父类指针指向父类的对象
p2->_fun(); //调用父类的同名函数
p2 = (_A*)&_b; //让父类指针指向子类的对象,由于类型不匹配所以要进行强转
p2->_fun(); //调用子类的同名函数
}

结果:

1
2
3
@└────> # ./a.out
_A:_fun()
_B:_fun()

虚函数表实现方式:

1
2
3
4
5
6
7
8
9
10
11
12
13
14
15
16
17
18
19
20
21
22
23
24
25
26
27
28
29
30
31
32
33
34
35
36
37
38
39
40
41
42
43
44
45
46
47
48
49
50
51
52
53
54
55
56
57
58
59
60
61
62
63
64
65
66
67
68
69
70
#include <stdio.h>
#include <string.h>
typedef void(*funcP)(void*);
typedef void*(*virTabPointer)[2]; //这是一个指针
typedef struct Animal {
//指向虚函数表的指针
virTabPointer m_virPointer;
char m_name[20];
} Animal;

typedef struct Tiger {
Animal m_base; // 继承基类
int m_age;
} Tiger;

typedef struct Bull {
Animal m_base; // 继承基类
char m_sex[6];
} Bull;

void SayName(void* this) {
Animal* thisA = (Animal*)(this); // 强转为基类
printf("我的名字是:%s\n", thisA->m_name);
}

void TigerEat(void* this) { // Tiger成员函数
Animal* thisA = (Animal*)(this);
printf("我的名字是:%s,", thisA->m_name);
Tiger* thisTiger = (Tiger*)(this);
printf("今年%d岁,我吃肉\n", thisTiger->m_age);
}

void BullEat(void* this) { // Bull成员函数
Animal* thisA = (Animal*)(this);
printf("我的名字是:%s,", thisA->m_name);
Bull* thisBull = (Bull*)(this);
printf("我的性别是:%s,我吃草\n", thisBull->m_sex);
}

void TemplateFunc(Animal* obj) { // 此函数用于调用子类的特有函数
//do something
void** tempIntPointer = (void**)(obj); // 取首地址
virTabPointer tempVTab = (virTabPointer)(*tempIntPointer); // 取虚表地址
funcP tempFuncAddress = (funcP)((*tempVTab)[1]);
tempFuncAddress(obj);
}

//指针的数组,数组中的所有元素都是指针,是个数组
void* animalVirTab[2] = {(void*)&SayName, NULL};
void* tigerVirTab[2] = {(void*)&SayName, (void*)&TigerEat}; // 有几个虚函数元素长度就是几
void* bullVirTab[2] = {(void*)&SayName, (void*)&BullEat}; // 有几个虚函数元素长度就是几

int main() {
Animal* basePointer = NULL; //基类的指针
// Tiger多态
Tiger tigerA;
basePointer = (Animal*)&tigerA;
strcpy(basePointer->m_name, "老虎");
basePointer->m_virPointer = &tigerVirTab;
tigerA.m_age = 5;
TemplateFunc(basePointer);
// Bull多态
Bull bullA;
basePointer = (Animal*)&bullA;
strcpy(basePointer->m_name, "牛");
basePointer->m_virPointer = &bullVirTab;
strcpy(bullA.m_sex, "男");
TemplateFunc(basePointer);
return 0;
}

结果:

1
2
3
@└────> # ./a.out
我的名字是:老虎,今年5岁,我吃肉
我的名字是:牛,我的性别是:男,我吃草

国内有时访问github会失败,这是为什么呢?

CDN(Content Delivery Network),即内容分发网络,也称为内容传送网络。它主要依靠部署在各地的边缘服务器,平衡中心服务器的负荷,就近提供用户所需内容,提高响应速度和命中率。我们访问的就是github的CDN。
DNS(Domain Name System), 即域名系统,它作为将域名和IP地址相互映射的一个分布式数据库,能够使人更方便地访问互联网。主要是做域名解析,域名最终指向的是IP地址。我们输入github.com的时候,会经过DNS解析,得到一个ip地址,电脑再使用这个ip地址来访问github。
DNS污染:就是域名系统被入侵或者认为的修改某些记录,导致对该域名的访问由原IP地址转入到修改后的指定IP,其结果就是对特定的网址不能访问或访问的是假网址。如果访问的DNS服务器被污染了,那么我们访问的网址ip可能就不对,导致访问失败。

解决方案:修改host文件

Windows:C:\Windows\System32\drivers\etc\hosts
Mac/Linux: /etc/hosts
优先级是host文件 > DNS服务器。host文件是本地文件,优先级最高,如果它中有指定的域名,那么就可以使用host文件中指定的IP地址;而DNS服务器则是远程服务,优先级次之,如果host文件中没有指定的域名,那么就会使用DNS服务器来查找相应的IP地址。我们的目的就是在hosts中告诉电脑,如果访问域名为github.com,那么他的ip就按xxx.xxx.xxx.xxx来算。

方法一

通过网站查询。https://tool.chinaz.com/dns, 输入github.com。得到ip地址,以

1
20.205.243.166  github.com

的方式加入到hosts文件末尾。

方法二

用ping命令查询得到其ip地址。

但是这个ip地址是会变化的,有没有更快捷的方法?

UsbEAm Hosts Editor

该工具可以快速测速,一键加入hosts地址,只要点点点的方式就可以执行上述组合操作。
下载博客地址:https://www.dogfight360.com/blog/475/
上个软件的截图
软件截图

C++多线程编程之std::future

1. std::future

std::future 通常由某个 Provider 创建,你可以把 Provider 想象成一个异步任务的提供者,Provider 在某个线程中设置共享状态的值,与该共享状态相关联的 std::future 对象调用 get(通常在另外一个线程中) 获取该值。如果共享状态的标志不为 还没有被 Provider 设置,则调用 std::future::get() 会阻塞当前的调用者,直到 Provider 设置了共享状态的值,std::future::get() 返回异步任务的值异常(如果发生了异常)。一句话概括,std::future 是为了线程间传递数据使用的。
一共有三种 Provider:

  1. std::async
  2. std::promise 调用 get_future() 函数
  3. std::packaged_task 调用 get_future() 函数

提示,std::future 独占资源,类似 unique_ptr,不可被拷贝。接下来看下三种 Provider 的用法。

2. std::async

先看一段代码:

1
2
3
4
5
6
7
8
9
10
11
12
13
14
15
#include <iostream>
#include <thread>
#include <future>
#include <chrono>

int main() {
std::future<int> fu = std::async([](int a, int b) {
std::cout << "thread start!" << std::endl;
return a + b;
}, 10, 20);

std::this_thread::sleep_for(std::chrono::milliseconds(2000));
int res = fu.get();
std::cout << "res=" << res << std::endl;
}

编译的时候需要链接pthread库。
运行结果:

1
2
thread start!
res=30

运行后立刻出现"thread start!"的字样,过了两秒出现结果。这是因为在运行 std::async 那一行的时候,直接会新建一个线程,执行函数的工作。这里使用的是 lambda 表达式,如果要传入自定义的函数需要加上 std::ref(函数名),传入函数引用(因为线程传入的是拷贝)。最后的 10 和 20 是运行所需的参数。之后主线程(主进程)睡眠 2000ms,阻塞在 fu.get() 上,直到线程运行完毕,最后打印结果。
综上所述,async 是为了把函数返回值带出来,用future来获取的。
这里注意有一个坑,如果不用 fu 来接收 std::async 的话,代码如下所示:

1
2
3
4
5
6
7
8
9
10
11
12
13
14
#include <iostream>
#include <thread>
#include <future>
#include <chrono>

int main() {
auto fu = std::async([](int a, int b) {
std::this_thread::sleep_for(std::chrono::milliseconds(2000));
std::cout << "thread start!" << std::endl;
return a + b;
}, 10, 20);

std::cout << "main" << std::endl;
}
1
2
3
4
5
6
7
8
9
10
11
12
13
14
#include <iostream>
#include <thread>
#include <future>
#include <chrono>

int main() {
std::async([](int a, int b) {
std::this_thread::sleep_for(std::chrono::milliseconds(2000));
std::cout << "thread start!" << std::endl;
return a + b;
}, 10, 20);

std::cout << "main" << std::endl;
}

这两段代码运行结果有什么不同呢?
第一个用 fu 来接收了 std::future,导致这个 future 对象还没有被析构。所以是先打印 main,后面再过两秒打印出 thread start,之后 future 对象才因为程序结束离开作用域被析构。
第二个代码因为没有接收 future 对象,导致这个右值直接析构。所以主进程等待 future 析构完成再继续往下走,所以打印是先等待两秒,之后打印 thread start,紧接着打印 main

3. std::promise

直接上代码:

1
2
3
4
5
6
7
8
9
10
11
12
13
14
15
16
17
18
#include <iostream>
#include <thread>
#include <future>
#include <chrono>

int main() {
std::promise<int> pr;
auto fu = pr.get_future();
std::thread t1([](std::promise<int>& p, int a){
std::cout << "thread start!" << std::endl;
std::this_thread::sleep_for(std::chrono::milliseconds(2000));
p.set_value(a);
std::cout << a << std::endl;
}, std::ref(pr), 2);
std::cout << "main" << std::endl;
std::cout << "fu.get()=" << fu.get() << std::endl;
t1.join();
}

返回结果:

1
2
3
4
main
fu.get()=thread start!
2
2

首先promise返回了一个 future 对象,表示 promise 承诺要传一个数给 future。之后运行线程 t1,给他传入了 promise 和一个数。在线程中,给 promise 设置了一个值。此时外面的 future 就可以调用 get() 方法获得线程中设置的 a。至于打印为何会断开,是因为在调用 fu.get() 的时候阻塞在那里了,所以先把前半段打印出来,等待 promise 传值给 future。
综上所述,promise 是用来和 future 绑定,给他传数据的。

3. std::packaged_task

1
2
3
4
5
6
7
8
9
10
11
12
13
14
15
16
17
#include <iostream>
#include <thread>
#include <future>
#include <chrono>

int main() {
std::packaged_task<int(int, int)> ta([](int a, int b) {
std::cout << "thread start!" << std::endl;
std::this_thread::sleep_for(std::chrono::milliseconds(2000));
return a + b;
});
auto fu = ta.get_future();
std::cout << "start to create thread" << std::endl;
std::thread t1(std::ref(ta), 2, 3);
std::cout << "fu.get()=" << fu.get() << std::endl;
t1.join();
}
1
2
3
start to create thread
fu.get()=thread start!
5

packaged_task 和一个普通的仿函数没有区别,只是返回值可以通过 future 来接收。结果同上,会在调用 fu.get() 的时候阻塞,等待线程 t1 执行完毕。
综上所述,packaged_task 是用来将一个 future 和一个函数绑定,返回函数执行结果的。和 async 的区别是它可以延迟启动,由 thread 来调用。当然你想要使用

1
2
ta(2, 3);
std::cout << fu.get();

那也可以,毕竟他也是个仿函数。

C++ 的 new

1
className a = new className;

new 是 C++ 的关键字,不能被重载。过程上分为两步:

  1. 分配内存。这一步底层就是调用了标题中提到的另一个 operator new 来完成的。也就是说最大的区别是 operator new 只负责分配内存,而 new 调用 operator new 并且调用构造函数。如果类 className 重载了 operator new(属于类里面的运算符),那么上述代码调用的就是
1
A::operator new(size_t)

来分配内存,否则调用的是

1
::operator new(size_t)

,由全局的 operator new 来分配。
2. 调用 className 的构造函数。

C++ 的operator new

相信看到这里已经知道他们的区别了,那么举个例子跑一下看看就清楚了!

1
2
3
4
5
6
7
8
9
10
11
12
13
14
15
16
17
18
19
20
21
22
23
24
25
26
27
28
#include <iostream>
using namespace std;
class A {
public:
static void * operator new(size_t size) { //重载类的operator new 改变new的行为
cout << "重载的类operator new 被调用!" << endl;
return malloc(size);
}
static void operator delete(void *ptr){ //重载类的operator delete 改变new的行为
cout << "重载的类operator delete 被调用!" << endl;
return free(ptr); //释放内存
}
static void * operator new[](size_t size) { //重载类的operator new[] 改变new[]的行为
cout << "重载的类operator new[] 被调用!" << endl;
return malloc(size);
}
static void operator delete[](void *ptr) { //重载类的operator delete[] 改变new[]的行为
cout << "重载的类operator delete[] 被调用!" << endl;
return free(ptr); //释放内存 }
}
};
int main()
{
A *a = new A();
A *b = new A[2];
delete (a);
delete[](b);
}

输出:

1
2
3
4
重载的类operator new 被调用!
重载的类operator new[] 被调用!
重载的类operator delete 被调用!
重载的类operator delete[] 被调用!